Installing ObserveIT Application Server
Depending on the sizing and architecture of the product deployment, you must install one or more ObserveIT Application Server(s).
This Application server is installed after you install the database and file server.
This topic describes how to install and verify the ObserveIT Application Server component on the first server. If you have multiple Application Servers, you need to repeat this procedure for each machine.
Do not attempt to install ObserveIT server-side components over the network. Always use a local copy of the installation files.
-
From the Command Prompt, select Run as administrator.
If prompted, Do you want to allow this app to make changes to your device?, select Yes.
-
Navigate to the folder with the extracted ObserveIT Installer. Navigate to the Web folder.
For example:
c:\Users\OITServiceAccount\Desktop\ObserveIT_Setup_vx.x.x.xx\Web -
Run PreRequisite_nodeServices.exe.
Check the check box with the message I agree to install the following products and click Install.
Wait for the installation to finish and then click Close.
-
From the command line, as an administrator, navigate to the folder with the extracted ObserveIT Installer. Navigate to the Web folder.
For example:
cd c:\Users\OITServiceAccount\ObserveIT_Setup_vx.x.x.xx\Web\AppServer -
Open the Start menu and type Command Prompt.
-
Right-click the Command Prompt shortcut icon and select Run as administrator.
If prompted Do you want to allow this app to make changes to your device?, click Yes.
-
From the command line, as an administrator, navigate to the folder with the extracted ObserveIT installer. Navigate to the Web folder.
For example:
cd c:\Users\OITServiceAccount\ObserveIT_Setup_vx.x.x.xx\Web\AppServer -
Type ObserveIT.AppServerSetup.msi and Enter.
-
In the ObserveIT Application Server window click Next.
-
In the Site field, select ObserveITApplication.
-
In the Application Pool field, select ObserveITApplication. Click Next.
-
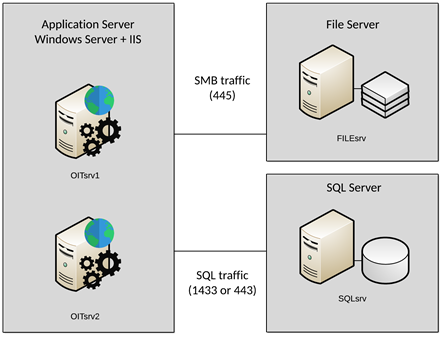
In the Server field, enter the details of the SQL server, in the following format:
<ServerFQDN>\<InstanceName>,<Port>For example:
SQLsrv.test.lab\ObserveIT,1433 -
Select the Windows Authentication radio button and enter the password for the current account – the ObserveIT Service Account - in the Password field. Click Test Connection.
If the test is successful, a success message displays, and the Next button becomes available.
-
Click Next. The installation begins.
-
After successful installation, click Close.
Open PowerShell as administrator and paste the following commands to execute above steps automatically.
The following command assumes the ObserveIT installer is located under the C:\Temp\ObserveIT-_Setup_v7.8.2.270 path. After the execution of the command, the installation will starts – just follow the prompts.
iisreset /stop
Get-Service WAS | Start-Service
Start-Process msiexec -ArgumentList '/i', "C:\Temp\ObserveIT-_Setup_v7.8.2.270\Web\AppServer\ObserveIT.AppServerSetup.msi", '/norestart', '/l*v ObserveITWebConsole_setup.txt' -Wait
iisreset /start
Verifying Application Server Installation
-
Connect to the ObserveIT Web Console machine.
-
Open the Start menu and type Run. Enter.
-
Type
%userprofile%\AppData\Local\Temp. Enter. -
Locate
AppServer_CA_Log.txtfile. Double-click the file to open it. -
Open the Find dialog. (Press CTRL+F on the keyboard.) Find RegisterApplicationServer
-
Locate the following line: RegisterApplicationServer: Done.
If the line does not exist or the word Done does not exist – the installation failed. Re-check the installation requirements, particularly the permissions for the SQL logins.
Installing Additional ObserveIT Application Servers
Depending on your deployment design and the number of concurrent recorded sessions, you may need to deploy additional ObserveIT Application Servers.
Before installing an additional Application Server, you must obtain a valid license from the ObserveIT Sales team.
When deploying more than one Application Server, you need to load balance the Agent connections with the multiple Application Servers.
(See Load Balancing.)
The steps required to install additional Application Server(s) and verify its successful installation are identical to the steps required for installing and verifying the first Application Server.
Related Topics:
Installing ObserveIT Components
Installing ObserveIT Web Management Console
Installing the Screenshots Storage Optimizer
Installing the Website Categorization Module
Verifying the ObserveIT Services Identity
** Go toCustom Installation Steps.