Configuring Service Desk Systems
When IT administrators or remote vendors are required to enter a ticket number from a Service Desk system in order to complete the login process to a corporate server, the ticket number that is entered by the user must be validated against the system.
ITM On-Prem (ObserveIT) Service Desk systems can be built-in or customized.
-
Built-in systems are provided by ITM On-Prem (ObserveIT) as out-of-the-box integrations ("ServiceNow" is currently supported).
-
Customized systems are implemented by customers according to their own requirements.
ITM On-Prem (ObserveIT) provides a template project as an example of a Web Service to help customers implement the integration with their own IT ticketing system. For details, please refer to the ITM On-Prem (ObserveIT) Service Desk Integration Guide.
The following procedures describe how to:
-
Create new Service Desk systems
-
Edit the parameters of existing Service Desk systems
-
Delete Service Desk systems
To create a new Service Desk system
-
Navigate to Configuration > Integrations > Service Desk Integration.
- Click the Service Desk Systems tab.
The Service Desk Systems tab opens, displaying a list of all the currently existing systems. Each system has a name and a URL to the server on which it is located.
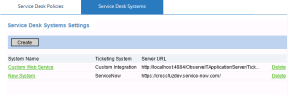
- Click the Create button.
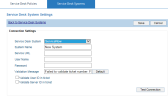
The Service Desk System Settings page opens, enabling you to define the system and test the connection settings.
-
In the Connection Settings section, specify the following information:
-
From the Service Desk System drop-down list, select either ServiceNow (built-in) or Custom Integration, depending on the type of ticketing system you want to create.
-
In System Name, specify a name for the new ticketing system.
-
In Service URL, enter the URL to the server on which the ticketing system (built-in) is located, or to the Web Service that was used to create the ticketing system (for a custom integration).
-
If you are configuring a built-in ticketing system, enter your User Name and Password. Note that these fields are not mandatory for a custom integration.
-
In the Validation Message text box, enter a message which the user will see in the case of an invalid ticket number, or accept the default message by clicking the Default button.
-
If you are configuring a built-in ticketing system, you can choose the relevant check box to Validate the User ID in ticket and/or Validate Server ID in ticket when validating the ticket number.
-
- After configuring your ticketing system, click Test Connection to test the connection settings.
A message is displayed, informing whether the connection is successful.
- If the connection is successful, click Save to save your settings.
The newly-created system will be included in the list of systems on which you can apply Service Desk policies.


To update an existing Service Desk system
-
In the list of currently existing systems, select the system whose parameters you want to update.
-
Edit the required parameters (as described above), test the connection, and then save your settings.
The updated system will be included in the list of Service Desk systems.
To delete a Service Desk system
-
In the list of currently existing systems, select the system you want to delete, and click the adjacent Delete link.
- A confirmation message is displayed. The Service Desk system is removed from the list.