Configuring Service Desk Policies
When a Service Desk system is integrated with ObserveIT's session recording system, IT administrators or remote vendors may be required to enter a valid ticket number in order to complete the login process to corporate servers. To enable this feature, you must configure Service Desk policies in the ITM On-Prem (ObserveIT) system. For details, see Integrating ITM On-Prem (ObserveIT) with a Service Desk System.
When configuring a Service Desk policy, you can specify the endpoints and endpoint groups on which the policy will be applied. You can also specify which users will receive a policy message upon logging in to the monitored endpoints; you can exclude specific users/groups from receiving the message or display the message to a limited number of users/groups.
By default, the use of domain local groups is disabled. In order to use domain local groups, you must enable the Allow LDAP local groups option in the System Settings page of the Web Console.
The following procedures describe how to:
-
Create a new Service Desk policy
-
Edit the parameters of existing Service Desk policies
-
Disable Service Desk policies
-
Delete Service Desk systems
To create a new Service Desk policy
-
Navigate to Configuration > Integrations > Service Desk Integration.
The Service Desk Policies tab opens, displaying all the currently active and disabled Service Desk policies in the system. From this tab, you can create new policies, update the parameters of existing policies, disable, and delete policies.
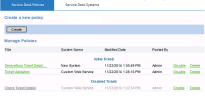
- Click Create.
The New Service Desk page opens.

-
From the Service DeskSystem drop-down list, select the name of the system to which you want to assign this policy.
Service Desk systems can be built-in or customized.
-
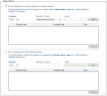
In the Service Desk Details section, specify the following information:
-
Window Title: Define a title for the ticket which will appear in the Ticket Window upon user login (for example, "Enter a valid ticket number").
-
Message To User: Enter the message text that will be displayed to the user in the Ticket Window.
Optionally, if you want to enforce the user to send a text reply to the ticket message, select the Comments Mandatory check box.
- Policy Type: Select one of the following options to define the required policy regarding the ticket number:
Always require a valid existing ticket number: The user will not be able to log in to the system without providing a valid ticket number.
Require a valid ticket number, but also allow on-the-fly creation of a new ticket: If the user does not have a valid ticket number, the user can select the check box, I don’t have a ticket number. Please create a new ticket and log me in, and a new ticket will be created in the system.
Ticket number is optional: A ticket number is not mandatory for the user to be able to log in to the system.
-
System Logo File (optional): Browse to select the logo image file to include the logo of the selected Service Desk system. The selected image is displayed in the preview box. (You can click Remove next to the image to change it). Note that supported image formats are .jpg, .png, or .gif; maximum supported image dimensions are 160 pixels (width) x 40 pixels (height).
-
-
In the Select Endpoints section, configure the endpoints and endpoint groups on which the Service Desk policy will be applied, as follows:
-
To browse for specific endpoints on which to apply the policy, click the
 button and select the endpoints from the Endpoints List, then click Add.
 -
To apply the policy to a group of endpoints, select the endpoint group from the Endpoint Groups drop-down list, then click Add. Options include: All Endpoints, Active Servers, Windows Servers, or Unix Servers.
You must add at least one endpoint. Default endpoints are not provided.
To remove endpoints from the list of endpoints on which the policy will be applied, select them and click Remove.
-
-
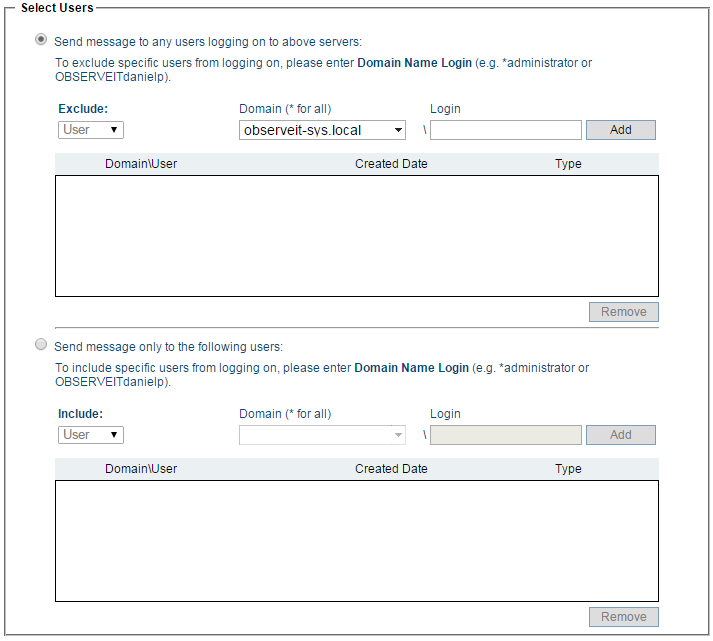
In the Select Users section, specify which users will receive the policy message upon logging in to the monitored endpoints. By default, the message will be displayed to any user that logs on to the selected endpoints.
-
To exclude specific users from receiving the Service Desk policy message, you can add them to the Exclude list.
-
From the Exclude drop-down list, select User or Group.
-
If you selected User, enter the Domain or select it from the list, specify the user's Login name, and click Add.
-
If you selected Group, enter the Domain Name or select it from the list, specify the group name in the Group Name field, and click Add.
The Domain/Domain Name drop-down list displays all the domains in the Active Directory forest in which the ITM On-Prem (ObserveIT) Application Server is a member. You can select "*" to exclude any user with the specified login name from receiving the message, regardless of the user's domain.
To remove users or groups from the Exclude list, select them and click Remove.
-
-
To display the Service Desk policy message to a limited number of users, select Send message only to the following users, and specify the required users or user groups that you want to include, as follows:
-
From the Include drop-down list, select User or Group.
-
If you selected User, enter the Domain or select it from the list, specify the user's Login name, and click Add.
-
If you selected Group, enter the Domain Name or select it from the list, specify the group name in the Group Name field, and click Add.
The Domain drop-down list displays all the domains in all the forests in the network. You can select "*" to enable any user with the specified login name to receive the ticketing message, regardless of the user's domain.
To remove users or groups from the Include list, select them and click Remove.
-
-
When you have finished configuring your new Service Desk policy, click Save.
The newly-created policy is displayed in the list of Active Tickets in the Service Desk Policies tab.


To update an existing Service Desk policy
-
In the list of Active Tickets in the Service Desk Policies tab, select the policy that you want to update.
-
Edit the required parameters (as described above), and click Save.
The updated policy is displayed in the list of Active Tickets.
To disable a Service Desk policy
-
In the list of Active Tickets in the Service Desk Policies tab, select the policy that you want to disable, and click the adjacent Disable link.
The policy is moved to the list of Disabled Tickets.
To delete a Service Desk policy
-
In the list of Active Tickets in the Service Desk Policies tab, select the policy that you want to delete, and click the adjacent Delete link.
After a confirmation message, the policy is removed from the list of Active Tickets.